Home Assistant. Обновление Python

18:17 Рубрика: Умный дом

Если вы пользуетесь Home Assistant, то после очередного обновления могли заметить на появившееся уведомление о том, что «Support for the running Python version 3.7.3 is deprecated and will be removed in the first release after December 7, 2020. Please upgrade Python to 3.8.0 or higher».

В стандартных системных репозиториях обычно содержатся стабильные и надежные версии пакетов, а не самые свежие и актуальные. И по состоянию на середину января 2021 года Python в репозиториях Debian и Ubuntu так и не спешат обновлять до версии 3.8.x.

Поэтому единственный вариант убрать назойливое уведомление и избавить себя от возможных проблем с совместимостью грядущих обновлений Home Assistant — это установить новую версию Python вручную, предварительно собрав ее из исходников.

  •  

Исходные данные

В этой статье я буду исходить из того, что:

  • У вас уже установлен Home Assistant
  • Он установлен в виртуальное окружение Python
  • Используется операционнная система на базе Debian или Ubuntu

Если вы пользуетесь Docker-контейнерами или дистрибутивом Hass.io, то обновлять пакеты вручную вам не придется.

Обновление Python

На заметку
Процесс обновления описан на примере актуальной на момент написания статьи версии Python 3.9.1. На странице загрузок Python всегда можно посмотреть номер свежего релиза и заменить ссылки на скачивание и распаковку архива в приведенных ниже командах.

Для начала остановим Home Assistant:

sudo systemctl stop home-assistant@homeassistant.service

Установим нужные для сборки из исходников пакеты:

sudo apt-get install build-essential tk-dev libncurses5-dev libncursesw5-dev libreadline6-dev libdb5.3-dev libgdbm-dev libsqlite3-dev libssl-dev libbz2-dev libexpat1-dev liblzma-dev zlib1g-dev libxslt-dev libxml2-dev libjpeg-dev zlib1g-dev

Скачаем и распакуем архив с Python 3.9.1:

wget https://www.python.org/ftp/python/3.9.1/Python-3.9.1.tgz
tar xzvf Python-3.9.1.tgz
cd Python-3.9.1

Соберем его из исходников и запустим установку:

./configure --enable-optimizations
make -j 4
sudo make install

Процесс сборки занимает около 12 минут на Raspberry Pi 4, поэтому придется запастись терпением.


После завершения установки можно проверить, что Python действительно обновился путем выполнения двух команд:

python3 --version
pip3 --version

И если в консоли появится такие ответы, то процесс обновления прошел успешно:

Обновление Python 3 в Linux для Home AssistantТеперь обновим менеджер пакетов pip:

sudo /srv/homeassistant/bin/python3.9 -m pip install --upgrade pip
sudo python3.9 -m pip install --upgrade pip

В случае если после обновления Python при запуске Home Assistant появится ошибка с доступностью библиотеки libffi.so.7 можно создать симлинк с libffi.so.7 на нее:

sudo ln -s /usr/lib/arm-linux-gnueabihf/libffi.so.6 /usr/lib/arm-linux-gnueabihf/libffi.so.7

Если симлинк не создается, то значит в вашей системе libffi.so.6 находится по другому пути. Найдите корректный путь через поиск по названиям файлов:

find /usr/lib -name "libffi.so*"

Переустановка Home Assistant

Теперь переустановим Home Assistant. Для этого сохраним в файл список используемых им пакетов Python:

cd /home/homeassistant/
sudo  -u homeassistant -H -s
source /srv/homeassistant/bin/activate
pip3 freeze –local > requirements.txt
deactivate
exit

Удалим директорию с установленным Home Assistant и создадим ее заново:

sudo rm -r /srv/homeassistant
sudo mkdir /srv/homeassistant
sudo chown homeassistant:homeassistant /srv/homeassistant

Запустим процесс установки по сохраненному ранее списку пакетов:

sudo -u homeassistant -H -s
cd /srv/homeassistant
python3.9 -m venv .
source /srv/homeassistant/bin/activate
pip3 install wheel
pip3 install -r /home/homeassistant/requirements.txt

И, наконец, перезапустим сервис Home Assistant:

sudo systemctl restart home-assistant@homeassistant

На этом процесс обновления завершен окончательно, и после перезапуска из панели уведомлений должно исчезнуть сообщение о неподдерживаемой версии Python.


(c) Dmitry's notes https://dmitrysnotes.ru/home-assistant-obnovlenie-python

Далее

ЛЕЧИМ BLUETOOTH В HOMEASSISTANT И ОБНОВЛЯЕМ PYTHON ДО 3.9.1

18:16 Рубрика: Умный дом

Если при добавлении bluetooth устройств в логе появились следующие ошибки

  • Polling error Could not read data
  • RuntimeError: Event loop stopped before Future completed.
  • AttributeError: module ‘socket’ has no attribute ‘AF_BLUETOOTH’
  • Broken pipe

То возможно поможет этот скрипт.

Рекомендую вводить его построчно, для того , чтобы контролировать результат выполнения команд.

python_update.sh
!/bin/bash
# установка необходимых пакетов
sudo apt-get install build-essential libglib2.0-dev libjpeg-dev tk-dev libncurses5-dev libncursesw5-dev libreadline6-dev libdb5.3-dev libgdbm-dev libsqlite3-dev libssl-dev libbz2-dev libexpat1-dev liblzma-dev zlib1g-dev bluetooth libbluetooth-dev
sudo pip3 install pybluez
# выбор корневой папки для компиляции Python
cd /home/pi
# скачивание архива исходников и разархивирование
wget https://www.python.org/ftp/python/3.9.1/Python-3.9.1.tgz
sudo tar zxf Python-3.9.1.tgz
cd Python-3.9.1
# компиляция и установка ; j4 это кол-во потоков задействованное в этой операции
sudo ./configure --enable-optimizations
sudo make -j 4
sudo make altinstall -j4
sudo apt -y autoremove
# останавливаем ha
sudo systemctl stop home-assistant@homeassistant.service
sudo systemctl stop homeassistant@homeassistant
cd /home/homeassistant
# бекапим настройки и venv
sudo mv .homeassistant/ .homeassistant_backup
sudo mv /srv/homeassistant /srv/homeassistant_backup
cd /srv
# создаем папку для окружения, меняем хозяина этой папки и переключаемся на него
sudo mkdir homeassistant
sudo chown homeassistant:homeassistant homeassistant
sudo -u homeassistant -H -s
cd /srv/homeassistant
# создаем окружение и активируем его
python3.9 -m venv .
source bin/activate
# устанавливаем ha 
pip3.9 install --upgrade pip
python3.9 -m pip install wheel
pip3.9 install mysqlclient
pip3.9 install homeassistant
# запускаем голый ha
hass
# ждем пока не загрузится админка http://ip_raspberry:8123,  и жмем ctrl c 
exit
# если все ок, то удаляем бекапы и восстанавливаем настройки
cd /home/homeassistant
sudo rm .homeassistant/ -R
sudo mv .homeassistant_backup/ .homeassistant
sudo systemctl start home-assistant@homeassistant.service
sudo systemctl start homeassistant@homeassistant.service
#даем разрешение на работу bluetooth
sudo setcap 'cap_net_raw,cap_net_admin+eip' readlink -f \which python3.9``


(c) MICROASSISTANT https://microassistant.ru/лечим-bluetooth-в-homeassistant-и-обновляем-python-до-3-9-1/

Далее

Прошивка Sonoff ZB Dongle-P под Z-Stack

18:11 Рубрика: Умный дом

Как показала практика, официальная инструкция1) сложна, страшна и не понятна, хотя по факту все просто.

Координатор

  1. Скачать и установить программатор SmartRF 2 (Локальное зеркало2));
  2. скачать и распаковать прошивку координатора Z-Stack 3.x.0 (Локальное зеркало);
  3. разобрать донгл, выкрутив 2 винта со стороны разъема антенны;
  4. нажать кнопку «BOOT», вставить в USB и отпустить кнопку;
  5. в программаторе, в разделе «Connected devices», нажать на «Unknown»;
  6. ниже, в списке «Select Target Device…» выбрать «CC2652P»;
  7. если надо, сделать резервную копию текущей прошивки3);
  8. перейти на закладку «Main», в разделе «Flash image(s)» установить «Single» и выбрать файл прошивки;
  9. в разделе «Actions» поставить галочки «Erase», «Program» и «Verify», не трогая прочие настройки;
  10. нажать синюю стрелочку.

На этом, собственно, все. ;-)

Заводская прошивка

Если вдруг что, оригинальная прошивка лежит тут:-)

(c) Knowledge WiKibase https://wiki.soloshin.su/iot/firmware/z-stack/cc2652p/sonoff/zb_dongle-p

Далее

How to: Setup HassOS on a KVM Virtual Machine

09:51 Рубрика: Умный дом

EDIT: I gave in and made the switch to Proxmox. Should have started there, its much easier to manage overall.

I've been using HA for about 2 years now on Ubuntu 20.04 which has been announced as unsupported. I ignored it for a while, but had a few update errors that made me want to make the switch. I came across a post by u/fourierswager that gave a high level guide to converting over to a VM Found here.

My problem was that the deploy VM step was more difficult for a novice like me so I figured I would provide a write-up to help someone else looking to migrate their system. I know a lot of people go with Promox, but I wanted to keep my existing Ubuntu system in tact and didn't want to load the desktop version. For each step I've included the source to help understand and support the functions. There maybe easier ways to do this so please correct anything I may have done wrong.

I already have Ubuntu server 20.04 setup and running and use Putty to ssh into it, but any software should work.

  1. Install a hypervisor: I chose KVM. A write up for the install can be found Here or use the two commands below to install via SSH.

     sudo apt -y install qemu-kvm libvirt-daemon bridge-utils virtinst libvirt-daemon-system
     sudo apt -y install virt-top libguestfs-tools libosinfo-bin  qemu-system virt-manager
    
  2. Install Cockpit. This allows you to manage the VM via webportal. Documentation Here and Here. This installs Cockpit that can be accessed via hostIP:9090 and installs the virtual machine manager.

     sudo apt-get install cockpit
     sudo apt-get install cockpit-machines
     sudo apt-get install virt-viewer
    
  3. To allow the VM to access your network and the internet you need to setup a network bridge. Documentation Here.

    cd /etc/netplan/
    sudo nano 50-cloud-init.yaml
    

The edited file should look like this. Highlighted in red was in my default file. I changed dhcp4: to false then added the bridges section below. update the ip addresses to the ip address of your host machine, not what you want the VM to be. Interfaces should match the ethernets section above. For me it was eno1, but yours may be different. Save the file and run the following commands to apply the settings.

    sudo netplan generate
    sudo netplan -debug apply

Next create a file named "host-bridge.xml" to the /etc/libvert/qemu/networks folder. You can do this next one in a single line, but being a novice i like navigating to the folder then creating the file.

    cd /etc/libvert/qemu/networks
    nano host-bridge.xml

copy the following and save in the host-bridge.xml file.

    <network>
      <name>host-bridge</name>
      <forward mode="bridge"/>
      <bridge name="br0"/>
    </network>

home stretch - create the new network, this will be seen in Cockpit for the next step

    virsh net-define host-bridge.xml
    virsh net-start host-bridge
    virsh net-autostart host-bridge

confirm the new network is created with the following command

    virsh net-list --all    

4. Now we're ready to create the VM image in Cockpit. If you have Ubuntu Desktop I recommend creating the VM in virtManager, but since I don't this was my solution.

Go to hostIP:9090 and should see the Cockpit login page. This will be the same log-in info for your host machine. Navigate to the Virtual Machines section and select import VM. See documentation for step #2 to see what this looks like. That example creates a new VM, where here we are simply importing one. Download the Home Assistant OS Image CQOW2 to you host machine and create the virtual machine Should look like this

Once its created you can go to the VM in Cockpit and find the console. This new VM will fail to boot because Cockpit does not boot the file as UEFI... Documentation Here. This is a fairly easy solution. Ovmf is used to boot the file, then we edit the VM file on the host machine to boot it correctly.

    Apt-get install ovmf
    cd /usr/share/ovmf/

confirm OVMF.fd is there. Now we need to edit the VM file to boot as UEFI.

    Virsh edit Virtual_Machine_Name

In the file edit the lines below to add the <loader... line so it looks like the code below.

    <os>
         <type arch='x86_64' machine='pc-q35-3.1'>hvm</type>
         <loader readonly='yes' type='rom'>/usr/share/ovmf/OVMF.fd</loader> 
         <boot dev='hd'/>
    </os>

Back to Cockpit, change the VM to work with bridged connection from step 3. Select edit and adjust the network settings from default to the new host-bridge. When the machine boots this automatically switches to br0. Image

5. Boot the VM and select Consoles in Cockpit. This will give you a visual of the VM and you should see the log-in for Home Assistant terminal similar to if you where to SHH into the machine. Log-in with "root" there is no password.

    network info

Will provide the assigned IP address to the VM. From there you should be able to access Home Assistant via your browser at Virtual Machine's IP address:8123.

I set a static IP address to the new VM via my router, but found that it reverted back for some reason so I also set the same static IP address via nmcli. I won't go into the details since it may not be necessary for everyone, but the documentation can be found here.

6. Final step - USB pass through. Documentation Here. This source does a pretty good job at explaining it so I won't re-paste everything here and there are a few system specific adjustments so probably best to just read the article. The short version is you edit the VM file similar to step 4 to add USB devices then create a USB.xml file with your device specifics then attach to the VM. Reboot everything and should be ready to import your snapshot. If you have the desktop version you should be able to also do this in virtManager.

This turned out longer than I was expecting, but I hope this helps anyone looking to do the same. I'm not sure how much I can help with any questions since most of this was found via googling each step which is why I provided the support documentation that I found to guide me through the process. It looks a little daunting at first, but its not that bad. The hardest part for me was just finding good documentation of what I needed to do.

Adding to this since I have to look it up every time. If you need access to the host command once in the HassOS CLI, just type "login"

(c) https://www.reddit.com/r/homeassistant/comments/klx7b7/how_to_setup_hassos_on_a_kvm_virtual_machine/

Далее

Bloodred Hourglass - Memento Mori

23:22 Рубрика: Медиа

Time is up
Count me out from the rest of the days
You may try
To fight the reaper inside of you
Leave you try
The wrap of sanity laid on you
Ask your gods
What are going to do when
There is nothing left to lose

I have already wondered
Enough in the time to be chosen
I’ll take it from here on my own
While your heart goes frozen

Questionize
Your path of sorrow
Keep your laws in your own graves

In the end we all
To the safe we fall
Buried alive by the darkness, now
What you need is what you breath
Take a look into these eyes
Let me say my last goodbyes
I wanna see the sun falling - so fall in
And dream out of sorrow

Never
Leave me
Die here

Hopeless on the grounds of the holy
Hearted
Suckers of the sorrow and lies behing the suffer

The circle will complete
And pass my pain away
Now can you judge my strength here
With more ignorance in veins
You might also like
Perdition
Bloodred Hourglass
Waves of Black
Bloodred Hourglass
Viva la Vida
Coldplay
It’s to be chosen when life goes on around here
There is no room for weakness right inside here
You are the reborn
Generation fail

Give me the doctrine of eternal sleep
Bring me the beauty what you can not see
You fucking piece of
Generation fail
We have no reason
To suffer all the pain

In the end we all
To the safe we fall
Buried alive by the darkness, now
What you need is what you breath
Take a look into these eyes
Let me say my last goodbyes
I wanna see the sun falling - so fall in
And dream out of sorrow

Never surrender to pain
They say you’ll survive
Burn it in your sermon
Freedom of soul
Give me my way to go
Weak upon
My heart will die
Can not go back and rewind my time
All that hate this world gone through
You bought yourself the fucking rules
Just to lie
Just to wait till we die

From the love that you break free
Turned into hate
Can’t be prayed free
Tearing our loved ones down
We were soulmates we were one
And i cannot believe it
Face the world as you see it
Cuz’ we were one until we’re done soon to be gone

All the love that you gave me
Burns in the heart soon to fail me
Tearing my life came down by force fed lies on starless
Skies again
No longer the pain revolves in me

Never
Ever wake up in me

Now
What we deceived (deceived)
In this life that forms us the sorrow (sorrow)
As we wither (wither)
Paralyzed in our prayers (prayers)
So we receive
This choice to bring in the hollow
Still we dream on
While you kill our final hope

Never ever
Wake up in me again

Далее

ёРадио

23:02 Рубрика: Умный дом

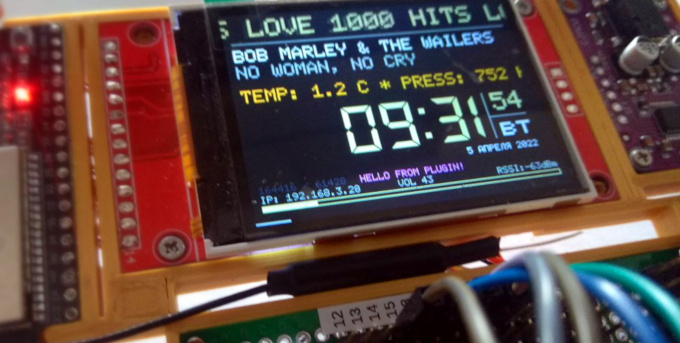
yoRadio

ESP32 Web-radio based on ESP32-audioI2S or/and ESP32-vs1053_ext library

Supported DAC modules:
I2S DAC, roughly like this one: https://aliexpress.com/item/1005001993192815.html
https://aliexpress.com/item/1005002011542576.html
or VS1053b module : https://aliexpress.com/item/32893187079.html
https://aliexpress.com/item/32838958284.html
https://aliexpress.com/item/32965676064.html

Supported displays:
ST7735 1.8' or 1.44', SSD1306 0.96' 128x64 I2C, SSD1306 0,91' 128x32 I2C, Nokia5110 84x48 SPI, ST7789 2.4' 320x240 SPI, SH1106 1.3' 128x64 I2C, LCD1602 16x2 I2C, LCD1602 16x2 without I2C, SSD1327 1.5' 128x128 I2C, ILI9341 3.2'320x240 SPI, SSD1305 (SSD1309) 2.4' 128x64 SPI/I2C, SH1107 0.96' 128x64 I2C, GC9106 0.96' 160x80 SPI (looks like ST7735S, but it's not him), LCD2004 20x4 I2C, LCD2004 20x4 without I2C, ILI9225 2.0' 220x176 SPI

Supported controls:
Three or five tact buttons https://www.aliexpress.com/item/32907144687.html
Encoders https://www.aliexpress.com/item/32873198060.html
Joystick https://aliexpress.com/item/4000681560472.html
https://aliexpress.com/item/4000699838567.html
IR Control https://www.aliexpress.com/item/32562721229.html
https://www.aliexpress.com/item/33009687492.html
Touchscreen https://aliexpress.com/item/33048191074.htm

More info

Bloodred Hourglass - Frames

10:59 Рубрика: Медиа

pushing it out of the picture
lines drawn out of the frames
been flanked from this existence
taken away the focus from the present

discredit in my flank
breaking me down dying my eyes open

just draw the line mark me out
inside your frames being dead is a place

my propose, for your dispose
so you just mark me out as rain on your
fucking parade
head nor tail - rue the day
trust no one and you're never betrayed

shotgun blast straight into the face from my goddess

discredit in my flank
breaking me down dying my eyes open

Bloodred Hourglass - Oceans On Fire

10:58 Рубрика: Медиа

Fearful faces stranded hearts
Between birth and death we all fall

Heartaches, fatal words
Cares of the waking world
Come to terms with our days and scars
As decorations

Final heartbeats giving in
Lose the battle to flatline
In my sweet end of the world
My sweet end of the world

On a day when the thoughts can be found
In a stone and six feet down the ground
Your world will bleed out of blessings
Breathe in my sweet end of the world


Are we planning to die tonight
Drift nothing learned
Where the oceans burn
Are we planning to live the night
Or paint the skies
With the ashes of the world

Burn oh my sweet end of the world
The revelation of desire and the final flame out
Fade out

Are we planning to die tonight
Drift nothing learned
Where the oceans burn
Are we planning to live the night
Or paint the skies
With the ashes of the world

If you're planning to die tonight
We'll hold the skies for a while

Die tonight
Never learn
Live the night
End of the world
If you're planning to die tonight
Don't bloody wait me
You'll bring us a world

To breathe
Drift with nothing learned
Live through the night
Grey the skies of the world

Are we planning to die tonight
Drift with nothing learned
Planning to live the night
Grey the skies of the world
Oceans on fire
Will freeze on the day
We drift to silence in safe

Далее

How to upate Home Assistant Core?

21:35 Рубрика: Умный дом

Here are the steps to update HA in a venv (old but I think they are still valid):

$ sudo systemctl stop home-assistant@homeassistant.service 
$ sudo su -s /bin/bash homeassistant
$ source /srv/homeassistant/bin/activate
$ pip3 install --upgrade homeassistant
$ deactivate
$ sudo systemctl start home-assistant@homeassistant.service

If necessary change the user “homeassistant” in the second line to whatever user you used to install HA.

(c)

Is there a way to downgrade Andrdoid System WebView?

21:33 Рубрика: Android

Please find my steps to downgrade Webview here

Step1: Uninstall update for Android Webview

Step2: download an older version from the given link, https://android-system-webview.en.uptodown.com/android/versions

Step 3: adb connect IP-OF-device

Step 4: adb remount

Step 5: adb push android-system-webview.apk /system

Step 6: adb shell pm install -r -d /system/android-system-webview.apk

(c)